Monday 28 October 2013

The Body Shop Haul

I love The Body Shop and when I saw they had put a cleansing face butter on their shelves I had to have it. But me being me, not being able to only buy one thing, I took advantage of their sale and a 40% off discount code to buy a few bits.


Camomile Sumptuous Cleansing Butter (£12)
This is a solid cleanser which you melt in your hands and rub into your face, to remove any makeup, oils and dirt with a hot cloth. I thought it worked really well and it had a really nice subtle scent. It also left the skin feeling fresh, smooth and moisturised, without causing any irritation.

Rainforest Volumising Shampoo (£6.50) & Conditioner (£6.50)
These are sulphate free, paraben free, colourant free and silicone free hair care products. I plan to only use them occasionally, as I've started co-washing my hair. But I've used them once and they left my hair feeling soft and smooth, the shampoo lathered up well and they cleaned out any hairspray and other hair products with ease.

Raspberry Body Butter
I've tried out a few of The Body Shop body butters (Coconut is my fave!) and this one was in the sale. It smells a little bit like raspberry milkshake, and I was worried that I'd find the scent a bit sickly after a while. However, the scent soon calms down after being on your skin for a couple of minutes, and it leaves your skin soft, moisturised and supple without that sticky feeling.

Honeymania Lip Balm (£4)
I love a lip balm and wear them all the time, and when I saw this I decided to get in on the beauty buzz  of honey based products (pardon the pun!). This lip balm is great, it isn't heavy on your lips and leaves a nice subtle sheen.

Almond Hand & Nail Cream (£10)
I've tried out The Body Shop's Hemp Hand Protector before and although it's great at moisturising your hands it was a little bit too heavy for me and took a while to sink in, also, I didn't really like the smell. So I decided to buy the almond one. I love this hand cream because it sinks in easier and smells a lot better, as well as also helping your nails, bonus!

If you have any questions about any of these products, or you have any suggestions of good Body Shop products I should try, let me know in the comments below!
Thanks,
  Cameron :)

Review: Lush Caca Brun Henna Hair Dye


I have been dying my hair for years, it started with a few bleach highlights pulled through a cap (ouch!) when I was 10 or 11. Since then I have always dyed my hair with colours, bleach, semi-permanents, demi-permanents, veggie dyes, sun-in, lemon juice and anything else I could get my hands on to change the colour of my barnet, as you can see in the picture below...


So, the last 10 years of hair-dying has definitely taken its toll, leaving me with very dry, snapping hair. Also I've noticed in the past year that my hair is getting a lot thinner, especially around the crown area. So in an attempt to ward off chemical-induced male pattern baldness I started looking into healthier hair dying options.

This is where henna comes in. From researching on the internet I found out that henna is meant to be much healthier for your hair than commercial dyes, and definitely healthier than bleach. It is a depositing dye, which means it does wash out eventually, but by repeat applications of henna you can end up with a long lasting colour. Real henna produces a orangey-red colour, however it can be mixed with other natural ingredients such as indigo to produce browns and other colours. Henna also doubles as a protein treatment, leaving the hair a lot stronger, smoother and glossier. Henna is also great for people who have allergies to commercial dyes as it's made out of more natural ingredients.

I'd heard that lush did great hennas for beginners, and as I wasn't not confident enough to mix up my own henna dyes I thought it was for the best to get one of theirs. Lush Caca Brun (£8.25 from Lush) is made up of 35% henna and 65% indigo, to produce a brown hair colour with a reddish hint. The dye comes in a solid block form made up of 6 squares. It also contains other ingredients to condition your hair whilst you dye. The block is a greenish-brown colour and resembles a block of dry mud.


So, I crushed up one block of the henna and mixed it with boiling water, adding it slowly to create a ketchup-like consistency. The mixture has a rather odd smell, which I can only describe as a mixture of cut grass, leaves, coffee and ponds cold cream (what?!) It isn't a particularly pleasant smell, but not unbearable.


I then applied the mixture to my head with a tint brush, and then covered it in a disposable mob cap. The instructions say to leave it on for 1-6 hours, dependant on how dark you want the result, and to wrap it in cling film if you want a more red colour. I didn't particularly want it to be really red, so I left it open, however it started crumbling off, hence why I put on the disposable mob cap. When I have brown hair I like it relatively dark, so I left it on for the maximum amount of time.


After 6 hours of walking around my house looking like a dinner lady I went to rinse it off. Firstly I rinsed out the henna as much as I could, until the water run pretty much clear. I then took a generous amount of conditioner and worked it through my hair massaging it in as if it was a shampoo (I read that shampoo strips the henna out of the hair too much as some of the ingredients need to carry on working for 24 hours). After rinsing out the conditioner and blow drying my hair I was greeted in the mirror with smoother, glossier hair which looks brown indoors, but has a vibrant auburn tint in the sunlight... I LOVE IT! The only negative I have is the rather odd smell of the mixture seemed to vaguely linger in my hair for a couple of days after, which is not too much bother, considering all the good its doing to my hair.

Overall I think this is a great hair-friendly alternative to hair dyes. I will definitely re-purchase, however this wont be very soon as I'm only using 1 block a time, so it will last me ages. Also, I'm thinking about trying out some of their other hennas (Caca Noir).

UPDATE! Results Picture.


Have you tried out Caca Brun or any of the other Lush Hennas? let me know how you've got on with them in the comments below! 

Thanks,
  Cameron :)

Sunday 27 October 2013

Review: Real Techniques Brushes

Over the past year I have ended up buying a lot of real techniques brushes. I am a big fan of Pixiwoo and when I found out about the brush range I bought a couple, and OMG I was so sucked in! Overall I've ended up buying 6 different individual brushes, the Duo-Fibre Set and the Starter Set so far... All of the brushes are synthetic, made from taklon bristles which means they are cruelty free. I have found that all of the brushes are very soft and wash up very well, no matter if you're using them with powder, cream or liquid products.


Firstly is the 
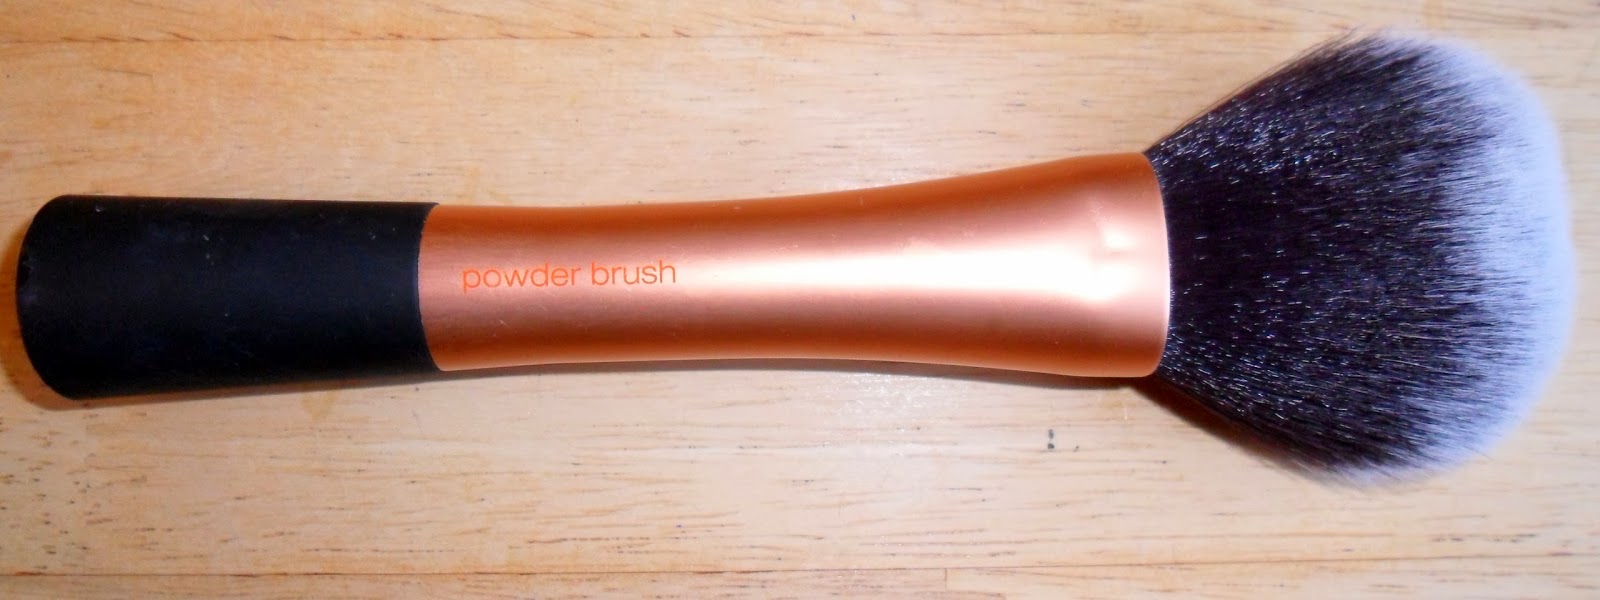
Powder Brush.(£12.99 From Boots) This brush is slightly over-sized and gives a great liberal application of any powder products, whether they are loose or compact it always gives great results. Personally I'd like it to be a tiny bit smaller but it's not a big issue & overall I love it!


Secondly is the Expert Face Brush(£9.99 From Boots) I absolutely love, love, LOVE this brush, so much so that I have two of them! It's versatile and can be used for buffing/stippling foundation, cream blush, cream contours, bronzers, anything! And its slightly tapered shape means that it can easily apply to small spaces such as around your nose and eyes. I personally use this brush for foundation most of the time, as the density makes buffing so easy and gives a great finish.


Next up is the Blush Brush.(£9.99 From Boots) I find this is great for blushes, bronzers and contours, the tapered shape of the brush means you only have to put the product right on the end of it, and brush does all of the blending out for you, amazing!


Next is the Stippling Brush.(£11.99 From Boots) To be brutally honest, I have a slight love-hate relationship with this brush, but I think it's because when I first got it I didn't really know what to use it for. This is good if you want a light-coverage finish with your foundation, I also use it for liquid bronzers and highlighters. (Also, when I first got this brush quite a big chunk of the bristles shed, but I'm guessing this was a one-off fault as none of my other brushes have done this, and after the initial shedding catastrophe no more bristles have fallen out!)


The last of the Face brushes is the Setting Brush.(£8.99 From Boots) This brush is great for precise application of powder highlighter, I have also used it for a one-colour sweep of eyeshadow on the eyelids.


Next up is the Limited Edition Duo-Fibre Set.(£23.99 From Boots) This contains a Face Brush, Contour Brush and an Eye Brush.


The Duo-Fibre Face Brush (Top) is great for light applications of powder, blushes and bronzers. Also, it gives you the choice to build up product gradually. The sparser bristles also make this brush great for blending out harsh lines in your bronzer, blush or contour.

I mainly use the Duo-Fibre Contour Brush (Middle) for applying cream contours, but it is also great for applying pigments as a highlighter, as it gives a really light application.

The Duo-Fibre Eye Brush (Bottom) is really good at blending out any eye makeup such as the crease, it is also really good for precise application of pigments.

The Starter Set (£21.99 From Boots) is a good eye brush set for beginners, giving you all of the tools you need to create nice eye makeup. It consists of a Deluxe Crease Brush, Base Shadow Brush, Brow Brush, Accent Brush and a Pixel-Point Eyeliner Brush.


Firstly the Deluxe Crease Brush (Top) is a dense rounded brush (almost like a mini Expert Face Brush!) and I personally use it for stippling/buffing in concealer. The size of this brush means its perfect to fit under-eyes and cover blemishes.

Next is the Base Shadow Brush (2nd Brush Down), this is a flat fluffy tapered brush which is a great all rounder when applying eyeshadow. The shape means that it can be used for packing on eyeshadow, defining the crease and blending.

The Brow Brush (3rd Brush Down) is a stiff, angled brush that gives you great precision and easy application when you're using a powder product to fill in your brows.

The Accent Brush (4th Brush Down) is a really good multi-purpose brush. To be honest with you, when I first saw it I really didn't know what on earth I'd use it for but as time has gone on I've found a lot of uses for it... Blending out pencil eyeliner, precise application of concealer on blemishes, contouring small areas such as the nose, applying lipstick, detailed eyeshadow work and precise application of pigments.

Lastly in the set is the Pixel-Point Eyeliner Brush. I don't particularly like this brush for eyeliner, unless I'm aiming for a really thick line. However, this brush is good for precise application of pigment and I have found it very useful for more theatrical looks, such as fancy dress.

P.S. This Set also comes with a stand/case for the brushes, which I don't personally use, but some people people might find it useful.

The final brush in my personal collection is the Lash-Brow Groomer.(£7.99 From Boots) For years I've had those plastic lash combs, but now I have one with metal teeth I'd never go back! Finally I have a lash comb which effectively removes clumps from my lashes and leaves them looking nice and defined, rather than just poking them in different directions! The Brow side of the brush is great too for putting crazy brows in shape.


Overall I LOVE the Real Techniques Range. All of the brushes are such good quality but at a very affordable price. Also the versatility of all the brushes is so good, so even if I don't use the brushes for what they are meant for I'll find another use for them.

If you have any questions, or you have tried out any of these brushes, or any others in the range, let me know how you've got on with them in the comments below!
Thanks,
  Cameron :)

Saturday 19 October 2013

Review: Maybelline Color Tattoo

As soon as I heard about Maybelline Color Tattoos I wanted some, and when I got them I wasn't disappointed... Colour Tattoos are marketed as cream-gel eyeshadows, with vivid colour and 24 hour staying power. I got 3 of the 12 shades: Pink Gold (65), Metallic Pomegranate (70) and Permanent Taupe (40) from Superdrug for £4.99 each.


Pink Gold is a light pink colour with gold shimmer and works really well in a subtle natural-eyed look. The Metallic pomegranate is a reddish purple colour, with flecks of gold shimmer, it works well with a slightly darker look with browns or purples. And the Permanent Taupe is a matte warm grey colour and would work very well in a black/grey smokey eye.


I think these cream eyeshadows are great, whether they're being worn on their own or under a powder eyeshadow. When used as a base for powder eyeshadow I find they give the eye makeup more depth and make the colours stand out more, as well as prolonging the wear-time. The eyeshadows are extremely pigmented and creamy, they are also very easy to apply and blend. The eyshadows can also be used as gel eyeliners when used with a brush, and perform very well.

If you have any questions, or you have tried out any of the Color Tattoos, let me know how you've got on with them in the comments below!
Thanks,
  Cameron :)

Thursday 17 October 2013

Review: Maybelline Brow Drama Sculpting Brow Mascara

In my opinion eyebrows are one of the most important features of your face, as they totally frame your face and show every emotion you feel. Also everyone would look rather odd without them... I've been drawing/filling in my eyebrows for about 5 years, I can't remember why I started, but I wouldn't be without my full eyebrows now! I've always really used eye shadow with an angled brush and a clear mascara over the top (and occasionally a pencil when plucking disasters happen...) But I got really excited when I saw that Maybelline were starting to do a tinted brow gel 'sculpting brow mascara' for only £4.99 in Superdrug, which is a steal! so I had to buy it.


The brow mascara comes in pretty ordinary mascara packaging, however the wand has a ball shape on the end. The shape of this want makes it easier to apply the product from all angles, also the wand doesn't pick up too much product, so you're not left with clumpy brows. The consistency of the product is quite thin, but I see this as a positive, as it means your eyebrows will not be too harshly coloured and they still look natural. I'm sure you could build it up if you needed more.


I love this brow mascara as I find it gives good colour and definition, as well as making my eyebrows stay put all day without them feeling 'crunchy'. However, I'm not too sure how people with sparser brows would find this product, I have a feeling it would be less effective on someone without quite a full brow.


If you have any questions, or you have tried out this product, let me know how you've got on with it in the comments below!
Thanks,
  Cameron :)

Tuesday 8 October 2013

Review: Lush Hair Extensions

Lush Hair Extensions have been around since 2006, supplying good quality 100% Remy human hair in a variety of different lengths, colours and volumes. Lush hair extensions sell extensions from 12 inches all the way up to 26 inches, in 25+ colours. They also sell false eyelashes, hair care products and many other accessories.

Last week it was my sisters 16th birthday, and she did what she always does when she gets money and bought herself some new hair extensions! She has tried out many brands and types of extensions from different companies, some cheaper and some more expensive, but always seems to return to Lush Extensions. She ordered the Deluxe Full Head (double wefted) in the colour #18/613 and 18 inches long, for only £56.99. The extensions come in a long plastic wallet with care instructions on the back. Impressed, as always, the extensions are really smooth and thick, without looking 'plasticy' and unnatural.


The extensions come with 1 x 8 inch weft, 2 x 6 inch wefts, 2 x 4 inch wefts , 1 x 3 inch weft and 2 x 2 inch wefts. The clips on the wefts are quite large and sturdy with a rubber back to ensure more grip. I find that these clips are less damaging to the hair than other clips, as they distribute the weight over more hair.


When the extensions are clipped in they blend very well, and the clips are virtually undetectable if clipped in properly. The colour match is spot on and volume of the extensions make the hair look totally natural.


Overall, I think Lush hair extensions is a great company offering affordable great quality hair extensions. They also do a free colour match, all you have to do is send in a picture of your hair and they will advise you on what colour suits you best.

If you have any questions, or you yourself have tried out these extensions before, let me know how you've got on with them in the comments below!
Thanks,
  Cameron :)

Monday 7 October 2013

How To: Groom & Fill In Eyebrows

I've been asked a few times in the past 'where do you get your eyebrows done?' and questions similar. To be honest I've always done them myself, mainly because I don't like forking out for someone to do something I can do myself. Also, I've seen other people who have had their eyebrows 'professionally' done and they've ended up four inches apart and one hair thick... Obviously there have been times when things have gone horribly wrong with over plucking, or over drawing etc. but I've learnt from my mistakes and found that with some practice, shaping and grooming eyebrows isn't that difficult.

Firstly I'd advise to map out where you want your eyebrow to be. It's best to use the handle of a thin makeup brush to work this out, or a pencil. Your eyebrows should begin above the widest point of the tip of your nose, this should prevent your eyebrows being too close together or far apart.You should then turn the brush so that it is still touching the widest point of the tip of the nose but also touching the outer side of the pupil of your eye when looking straight ahead, this is where the arch goes. The eyebrow should end at where the brush shows when moved to the edge of the eye (shown in the picture below).


I then find it useful to draw on where you want your eyebrow to be, with a sharp dark pencil to clearly define the hairs you need to keep and the ones you want to remove. If you want to grow your eyebrows back or thicken them up then draw over the areas you want, to make sure you don't remove them.


After I have clearly defined what I want to do with my eyebrow I pluck and thread the hairs outside of the lines. When plucking my eyebrows I use tweezerman slanted tweezers as they are sharp and relatively thin so they allow you to be precise with the hairs you're removing. I thread my eyebrows afterwards as it's better at removing the thin, fuzzy hairs you don't see and the tweezers don't pull out as this gives a much cleaner finish. I find using a bright coloured thread makes the job much easier as it makes it easier to see what you're doing. I just taught myself how to do this from watching youtube videos. After plucking and threading I then comb the eyebrows upwards and trim the hairs which look out of place.


After grooming the eyebrows into shape I comb them so they are all going the same way (up and out towards the edges of my face.) I then move on to filling them in, personally I use a brown eyeshadow and a slanted brush from the body shop, as I feel this looks more natural and less harsh than pencils. However, people with very sparse or over plucked eyebrows might want to use a pencil underneath to define the eyebrow better. I then finish the eyebrows off by applying a clear brow gel (a clear mascara would probably work the same.)

A couple of extra tips...
  1. Never shape your eyebrows by plucking from the top, it will make you end up with no arch.
  2. When drawing on your eyebrows make the inner halves of your eyebrows a bit lighter, with less product. This makes the eyebrows look more natural and more flattering to the face.
  3. If in doubt about making your eyebrows thinner don't do it! It can take a long time to grow back brows and sometimes over plucking can leave permanent bald patches.

If you have any questions, or eyebrow-related tips let me know in the comments below!
Thanks,
  Cameron :)